photoshop tutorials, learn photoshop, learn photoshop on video, learn how to use photoshop, learn graphics, learn how to do graphicsgraphic design videos, graphic design instructional videos,photoshop instruction, photoshop lessons,photoshop lessons on video, learn photoshop videos, photoshop tutorial videos,

Thursday, September 10, 2009

Hide Nude Picture


Hide Nude Picture

Select Nude picture and trees on the water from google search.
and Save on PC
open File of Trees picture and then select Pen Tool and selection for trees picture and keep on Photoshop .
open File one more for Nude picture and Move trees picture to body naked and save it . Finish


[ttt.jpg]
https://blogger.googleusercontent.com/img/b/R29vZ2xl/AVvXsEi709zUE8axn203X_ijspRzCw2pakZ3EvvGoJEraj8W55Hv6xpk9JwDOald5i_rSUfkxaWzXtwD2pm2mySxrEV0yIwN6X7VA2ksiEZh04LFvx6c9U4KIH6IJsHGl-kU_yzQdYPyRcnarXk/s1600/heather_jo_hughes_010+copy.jpg
For Sample Picture


Wednesday, September 9, 2009

Text Effect

Text Effect

1.Create a new image with a size of around 1000x1000px, with a white background. It's wise to start out with a nice big work area to get the best results - we will reduce the size later. If you plan to apply this effect to a full word, you should increase the width of the image as necessary. Firstly, use the Color Picker to choose the color for your text (the example uses R:0 G:132 B:255, though you can choose another color if you prefer). Select the Type Tool, and type your text as big as you can so it fills as much of the canvas as possible.
Example 1
Example 1

2.

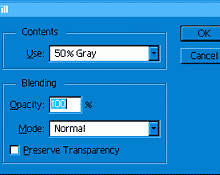
Now create a new Layer (Layer 1). Hold CTRL and click on the type layer you created in step 1 to create a selection of your text. With "Layer 1" selected on the layers palette, go to Edit » Fill and in the pop up use the settings shown in the image below.
Example 2
Example 2

3.

Do not lose the selection of the text. Switch to the channels palette, create a new channel and fill the selection with white. Go to Filter » Blur » Gaussian Blur and enter 14. Then again, Filter » Blur » Gaussian Blur and enter 7. And again Filter » Blur » Gaussian Blur and enter 4. Last time Filter » Blur » Gaussian Blur and enter 2. Deselect (CTRL+D) and go back to the layers palette.

Now, hold CTRL and click on "Layer 1" and then go to Filter » Render » Lighting Effects.
Match These Settings
Example 3
Example 3

4.

Your text should now look similar to the example below. Now you need to blur this layer to get rid of the jaggies, so go to Filter » Blur » Gaussian Blur and enter 2 for radius.
Example 4
Example 4

5.

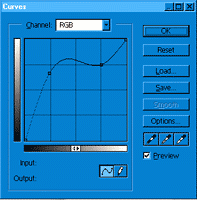
The next step is to make a curves adjustment. Go to Image » Adjust » Curves. Match the settings as close you can to the picture below. The closer you get the more realistic the effect will be.
Example 5
Example 5


6.

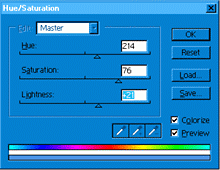
You should see the plastic effect coming along now, though some color adjustment is still needed. Go to Image » Adjust » Hue/Saturation. Match the settings to the example image below, and don't forget to check the "Colorize" box in the bottom right corner.
Example 6
Example 6


7.

Now for a few more color adjustments. Bring up the Color Balance tool by pressing CTRL+B, and make sure "Preserve Luminosity" is checked. Enter the following settings:

Shadows: 0,0,-100
Midtones: 0,0, +93
Highlights: 0,0,-15

Click OK when finished, and it should look something like the sample below.
Example 7
Example 7

8.

All that remains is to add a drop shadow (Layer » Effects » Drop Shadow) and resize the image to the size you intend to use it at, (Image » Image Size). Of course you may want to keep a relatively large extra copy before you resize, so you can always go back and use a bigger version of your image if you decide to.
Example 8
Example 8

Tuesday, September 8, 2009


View All Friends |
href = http://blogs.myspace.com/index.cfm?fuseaction="blog.listall&friendid=">View Blog |
href http://comment.myspace.com/index.cfm?fuseaction="user.viewprofile_commentform&friendid=&mytoken=c76144c4-0114-40a6-8c9f-d0cbabf0f838" =>Add Comment

href>

href>

Sunday, August 30, 2009


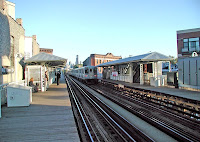
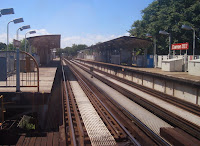
Station di Damen


Photo colection

Saturday, August 29, 2009

Hair Model

Style Hair Cut

One thing that bugs me when viewing images either on or off the web, especially in magazines, is the shoddy cutouts around a person. Due to tight time restraints it is much quicker to add a rough trim to a photo with the hopes that people wont be bothered.

Well there is a way in Photoshop to quite easily re-create a hair effect after a rough trim, and it only uses one tool!

Advisory equipment

This technique produces best results when using some form of graphics tablet. It can be done using a mouse but it is a little more challenging to achieve smooth curves and effects.

What we plan to do…

Generally when cutting out people in photographs, the majority of the work is pretty straight forward. Everyone has their own techniques for this, but time after time there seems to be this trend for just rough cutting around the hair line.

In this tutorial I will show you a very simple way to cut out a photograph and deal with the sticky situation of the ‘Cut out hair’. We will be re-creating the hair in a neat and tidy manner, allowing the photograph to be placed on a range of backgrounds.

Lets crack on… Firstly we need to select a photograph.

Tutorial Image - Male Model

Here I have chosen a male model with spiky hair. My main reason for this is it will enhance the effect and show off the technique better than say a female with straight hair. Although the technique works for all hair types! In case anyone was thinking I am a ‘hairist’!

This image is royalty free and can be downloaded here.

A rough cutout

First of all we are going to perform a rough cutout of the model. We need to create a new transparent layer in Photoshop and set it beneath our image layer. As I mentioned above, there are many techniques of cropping and cutting out images, in this tutorial I will be using the Polygonal Lasso Tool (L) I will not be masking any layers as we will be directly editing the cutout.

So start off by cutting out the body, neck and lower face of the model up to the bottom of the hairline just above the ear.

Tutorial Image - Cutout of body and neck upto hairline

You may notice the image used is a low resolution image. Again this is only for the purposes of this tutorial, and in fact the technique works much better in higher resolutions.

Tutorial Image - Cutout upto hairline

At this stage we are still rough cutting. For the next step we are going to perform the first trim around the models head. This can be as rough as you like but be sure not to cut to deep into the shape of the head and try to imagine and follow a rough line where you would imagine the hair spikes to be. I have deliberately cut to deep in the image below to show how easily this technique can rectify a mistake.

Tutorial Image - Example rough cutout around hair

The close up view shows how accurate/inaccurate you need to be.

The finished rough cut

As you can see below, we are now at a stage where the model is fully cut out with a rough edge around the hairline.

Tutorial Image - Finished Rough Cut

The ‘Smudge’ technique

OK we are now ready to give this guy a better haircut! This whole technique works around the ‘Smudge’ Tool (R). Now, for this particular image I have chosen the following settings for my smudge tool.

Tutorial Image - Smudge tool settings

If you select the smudge tool and then edit the Brush Preset. You need to use a standard brush head, we will manually set the size to 1px and set the hardness to 80%. Close the Brush Preset and set the strength of the smudge tool to 80%. As I said, these setting will work nicely for this image, but for a higher resolution image you may want to play around with the brush sizes and strengths.

It is always good to keep the brush tool pretty hard or the hair goes to wispy. Last setting to check before we continue is to make sure the ‘Sample all layers‘ box is unchecked. This will smudge all layers and will mess up your background image if you were editing on top of one.

Lets start smudging!

The first thing I would say before we start is to always try to follow the current direction of the hair, don’t be worried to throw in some curves and cross overs as no hair is perfect! In fact the more perfect you make this the less realistic it will be. And always try to work outwards away from the face unless you are doing tidy up strokes or working with long hair.

Tutorial Image - Starting to smudge

It doesn’t really matter where you start on the hair as it will all flow into itself as you move around.I will try to show my motions through this one section of the hair. The blue lines show pulls or drags away from the face, the red lines show corrections or drags into the face. The correction lines are for removing any stray wispy/blurry sections. I call it ‘cutting in‘.

Tutorial Image - Pull and Cut lines

As you can see I have worked with the image and the natural hair line to extend and enhance the edging. The deeper the pull the further forward the hair should be as you will be overlapping previous smudges. I would advise working from back to font by editing the outside hair first and working inwards.

Continue doing this around the full circumference of the hairline.

Tutorial Image -Cutout Finished

And that is it! One technique to create a nicely cut out head of hair. You can now look to place your image on any background and any colour varient you like. Below are some examples…

Grungy Background

Tutorial Image - Grungy background

Lively Background

Tutorial Image - Lively background

Add some fun highlights!

Tutorial Image - Highlights

Hope you like the tutorial! Give it a go, its a really easy technique and you can get some very nice results.

Smoke Effect Lighting

Smoke Effect

ince my last article on how to create smoke generated lots of traffic, I decided to write another one on some of the photoshop effects. Although I use Photoshop on a daily basis, I am by no means a photoshop expert.

Well what I want to show here is how to create a nice light and magic effect.

1 - Create a radial gradient, in this case from a purple to a really dark purple

2 - Here I added a really cool Icon of a magic hat from the Crystal Clear Collection by Everaldo

3 - Add some text, I used the source code of a site to get the text and apply the Distort >Wave filter


Create two stripes of text

4 - Rotate and place the text

5 - Add some light using glow : Use different values for each line of text, the secret here is the blending option COLOR DODGE..


Change the values of Spread, Size and Range

6 - Group the 2 lines of texts and with one apply a mask to make the stripes disappear at their ends.

7 - With the other group of text apply a gausian blur, after that delete some parts to show the non-blury text.


This will add a movement feel to the text, like they are really being magicaly created.

8 - Create a new layer below the text and with a regular big brush like 100px add a spot of light in white.


The layer must be below the text, otherwise the glow will not affect the white spot

9 - Make some smoke again, I used the eraser, I could've used the liquify as well

10 - Create a cloud: to do that make use a marquee with feather set to a value bigger than 20 and apply the render>clouds holding the command key(mac), ctrl key(win).


The same as the previous post, and the most important thing apply the COLOR DODGE blending options on it

11 - Sparks: For the sparks create a brush, play with the shape dynamics, scatering, and other dynamics. After that, apply a Outer Glow and Inner Glow to create the magic effect.

End - The result is really simple but at the same time it looks beautiful.

The whole process took me about 35 minutes, one thing I think is really cool is to apply the color dodge blending option to folder, and put blured elements inside of it. Using it you can create some really amazing light effects.

Designe Template By Achmad Fuad